 Dimension Add ( Drawing Editor > F3 )
Tool summary :
Also see :
- Drawing Editor (where Dimension Add is a tool)
- Dimensions (topic)
- Edit Dimension (window for editing dimensions
- Unshorten (before using Dimension Add )
- Ctrl+Shift (brings up Actual - Horz - Vert mouse bindings)
- Layer Panel (drawing layer dimension are added to)
- Dimension Add Actual (alternative to Dimension Add )
- Dimension Add Horizontal (alternative to Dimension Add )
- Dimension Add Vertical (alternative to Dimension Add )
- Add Extension Dimension (alternative to Dimension Add )
- Add Drag Off Dimension (alternative to Dimension Add )
page 1 | contents | objects > dimensions > | objects -- dimensions | xxx add | dimensions
 Setup and defaults :
Setup:
- Dimension terminals (arrows or slashes)
- Expand dimensions less than or equal to
- Material point dimension holdback distance
- Confirm adding of dimensions ( User and Site Options > Drawings > )
- Show "on radius" dimension (for arc dimensions)
Defaults for user added dimension labels:
Defaults for auto detailing:
Dimension line defaults:
- The " Dimension pen color " for the legs and lines of system-generated and user-added dimensions is set in Drawing Presentation . To change this on individual drawings, you have to Dimension Edit or Dimension Edit All then reset the " Pen color " on the edit window.
page 1 | contents | objects > dimensions > | objects -- dimensions | xxx add | dimensions | top
 To invoke Dimension Add (in the Drawing Editor ) :
Method 1 : Click the Dimension Add icon. The icon can be taken from the group named ' Objects -- Dimensions ' and placed on a toolbar (classic) or the ribbon (lightning).
Method 2 : If " Drawing Editor layout style " is ' Classic ', you can use the menu system to choose Objects > Dimensions > Add .
Method 3, 4 or 5 : Dimension Add can also be invoked using a keyboard shortcut , the context menu , or a mode . For the ' Lightning ' layout style, configuration of the interface is done using Customize Interface .
Method 6 : With mouse bindings for Dimension Mode active, middle-click ( Add ).
page 1 | contents | objects > dimensions > | objects -- dimensions | xxx add | dimensions | top
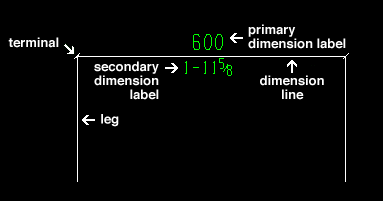
 The parts of a dimension :
|
page 1 | contents | objects > dimensions > | objects -- dimensions | xxx add | dimensions | top
 Dimensioning two or more points :
|
| ( click here to see an example ) |
Dimensioning two points adds a single dimension. Dimensioning three or more points adds a dimension chain. The following instructions assume that you are using a 3-button mouse and that User and Site Options > Drawings > " Confirm adding of dimensions " is off (not checked).
1 . Do the following, as needed, then invoke Dimension Add in step 1c:
1a : If your current drawing has been shortened, you should Unshorten the drawing before adding the dimension. After you are done working on the drawing, you can Shorten the drawing again.
1b : Either allow the program to select a layer of its choosing -- or -- on the Layer Panel, select the drawing layer that you want to add the dimension to.
1c : Invoke Dimension Add .
2 (optional) . You can skip this step and go to step 3. Or you can designate the type of dimension that you want to add. If you skip this step, the instructions in step 5, possibility 1 will apply to you.
|
|
|
|
|
|
|
|
|
|
|
|
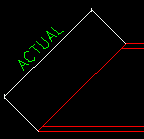
Alternative 1 : Ctrl + Shift Hold down the keys then left-click ( Actual ) to dimension the actual distance between the points that you will locate is steps 3 and 4. See for actual dimensions , or go to step 3.
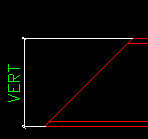
Alternative 2 : Ctrl + Shift Hold down the keys then middle-click ( Vert ) to dimension the vertical distance between the points that you will locate is steps 3 and 4. Go to step 3.
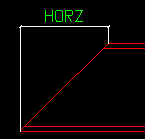
Alternative 3 : Ctrl + Shift Hold down the keys then right-click ( Horz ) to dimension the horizontal distance between the points that you will locate is steps 3 and 4. Go to step 3.
Alternative 4 : Hold down the Ctrl key then left-click ( Arc ) to add an arc dimension. Do not continue with these steps. Instead, see the step-by-step instructions for . adding an arc dimension .
Alternative 5 : Ctrl Hold down the key then middle-click ( Angle ) to add an angle dimension. Do not continue with these steps. Instead, see the step-by-step instructions for adding an angle dimension .
Alternative 6 Shift Hold down the : key then middle-click ( Drag Off ) to drag off a dimension from a line or polygon side. Do not continue with these steps. Instead, see the step-by-step instructions for dragging off a dimension .
For Actual dimensions, the status line prompts, " Optional dimension line rotation: " Locate- Pan -Return mouse bindings become active. This option is beneficial if you plan to locate more than 2 points in step 5b.
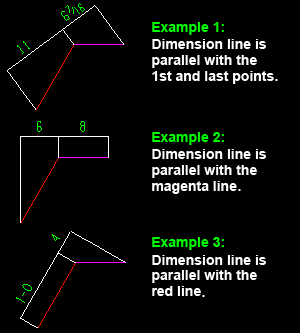
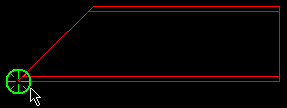
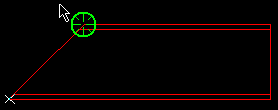
All of these examples were created by choosing Actual and locating three exact points , each at a different end of two lines.
Example 1 was created by doing a right-click ( Return ) (Alternative 1).
Example 2 was created by selecting the magenta line (Alternative 2).
Example 3 was created by selecting the red line for the dimension line to be parallel with (Alternative 2).


bindings (for Actual only) For Actual dimensions, alternative 1 : Right-click ( Return ) if you want the dimension line to be parallel to an imaginary line through the first point you locate (in step 3) and the last point that you locate (step 5). Go to step 3.
For Actual dimensions, alternative 2 : The Locate option BSRL ( Base Real Line ) is selected by default. You can instead choose to use BSCL ( Base Construction Line ) or BSMB ( Base Member Line ) or PERP ( perpendicular ) or ANGL ( Angle ). Do one (1) of the following to set the rotation of the dimension line :
If BSRL or BSCL or BSMB are selected, position the mouse pointer (
) next to a line or polygon side or construction line or member line that you want the dimension line to be parallel to and, when that line is highlighted, left-click ( Locate ).
If PERP is selected, place the mouse pointer (
) next to the construction line you want the dimension line to be perpendicular to and, when that construction line is highlighted, left-click ( Locate ).
If ANGL is selected, left-click ( Locate ) anywhere on screen, then enter the angle of rotation that you want for the dimension line.
3 . Locate - Remove - Return mouse bindings become active along with various Locate options.
|
|
|
bindings |
|
3a : Select the Locate icon that you want (if it's not pressed already).
3b : Position the mouse pointer (
) on screen so that the point location target (
) snaps to where you want to measure from , then left-click ( Locate ).
4 . An X appears at the point you located in step 2. This X marks the base of the dimension leg as well as the point to be measured from. Locate - Remove - Return mouse bindings continue to be active.
|
|
|
bindings |
|
Alternative 1 : Position the mouse pointer (
) so the target (
) snaps to the point you want to measure to , then left-click ( Locate ). Go to step 5.
Alternative 2 : Right-click ( Return ) if you want to add an extension dimension. Do not continue with these steps. Instead, see the instructions for adding an extension dimension .
5 . The status line prompts, " Locate dimension line ." The preview of the two-legged dimension that Dimension Add gives you changes as you reposition the mouse pointer ( ![]() ) and the target (
) and the target ( ![]() ). Possibility 1 or possibility 2 applies depending on whether or not you skipped step 2 ,
). Possibility 1 or possibility 2 applies depending on whether or not you skipped step 2 ,
|
|
|
bindings |
Possibility 1 (if you skipped step 2) : Dimension Add determines what type of dimension you want based on the position of the target (
) with respect to the first two points you located. " (HORIZONTAL) " or ("VERTICAL") or ("ACTUAL") is noted in the preview of the dimension and can change as the target moves. Left-click ( Locate ) to set the dimension type (horizontal or vertical or actual) and the location of the dimension line . The video (
) at the beginning of these instructions nicely summarizes how to do this step. Go to step 5b.
Possibility 2 (if you did step 2) : Left-click ( Locate ) at any point through which you want the dimension line to be drawn. This point also sets the length of the dimension legs . Go to step 5b.
5b . To get only the two-legged dimension that is shown on screen, right-click ( Return ) without locating any additional points. Or you can optionally left-click ( Locate ) more points if you want to add a dimension chain. If you locate too many points, middle-click ( Remove ) to remove the last point located. When you are done locating points for dimensioning, right-click ( Return ).
6 . Assuming that User and Site Options > Drawings > " Confirm adding of dimensions " is off (not checked), Locate - Remove - Return mouse bindings become active.
|
|
|
|
|
|
|
|
|
|
|
|
Alternative 1 : Add additional dimensions by following these instructions beginning with step 2 or step 3 .
Alternative 2 : If you are done adding dimensions, right-click ( Return ) or press the Esc key.
Tip: Dimensions added using this procedure can be quickly removed (one chain at a time, in reverse-order of their addition) by using Undo .
page 1 | contents | objects > dimensions > | objects -- dimensions | xxx add | dimensions | top
 Adding extension dimensions
| ( click here to see an example ) |
page 1 | contents | objects > dimensions > | objects -- dimensions | xxx add | dimensions | top
 Adding arc dimensions
| ( click here to see an example ) |
page 1 | contents | objects > dimensions > | objects -- dimensions | xxx add | dimensions | top
 Adding angle dimensions
| ( click here to see an example ) |
page 1 | contents | objects > dimensions > | objects -- dimensions | xxx add | dimensions | top
 To drag off a dimension
| ( click here for a video ) |
These instructions assume that you have already invoked Dimension Add and that Locate - Remove - Return mouse bindings are active.

no key pressed
1 . Hold down the Shift key to activate Actual - Drag Off - Return mouse bindings.

Shift key pressed
2 . Middle-click ( Drag Off ) anywhere in the drawing.

Shift key pressed
3 . Select - Pan - Menu mouse bindings become active, and the status line prompts you to " Select a side for dimension ."

for selecting a "side"
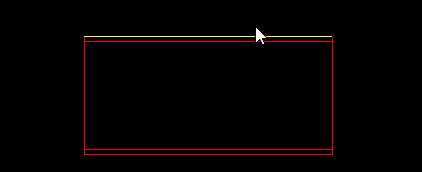
3a : Place you mouse pointer (
) so that it highlights a polygon side or a segment of a line , then left-click ( Select )
4 . A preview of the dimension that you can drag off is shown. Locate - Remove - Return mouse bindings become active.


for positioning the dimension line
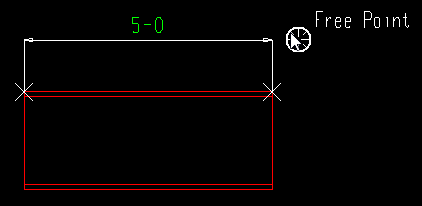
4a : Place your mouse pointer so that the point location target (
) snaps to a point in alignment with where you want the dimension line, then left-click ( Locate ).
5 . The dimension is drawn on screen. Assuming that User and Site Options > Drawings > " Confirm adding of dimensions " is off (not checked), Locate - Remove - Return mouse bindings remain active. The illustration below shows the results after choosing alternative 2.

no key pressed
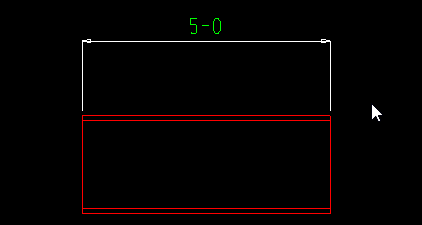
Alternative 1 : Add additional dimensions by following these instructions beginning with step 2 or step 3 of the procedure for dimensioning two or more points.
Alternative 2 : If you are done adding dimensions, right-click ( Return ) or press the Esc key.
Also see: Add Drag Off Dimension is a related tool.
page 1 | contents | objects > dimensions > | objects -- dimensions | xxx add | dimensions | top
